

After learning the basics of knitting, the next step for beginners is to find a pattern to start your project. While making the stitches is one thing, figuring out how to read a knitting pattern can be a whole other skill set. Don’t be intimidated! You can figure out the best approach for reading a knitting pattern in no time.
Even though each designer might have their own stylistic approach to laying out their patterns, most patterns share common elements. By mastering these, you’ll be able to apply your pattern-reading skills to any knitting project.
Parts of a Pattern
First, let’s go over the basic structure of a pattern. The beginning is usually loaded with information before you actually get into the instructions for making your project. There is often a paragraph describing the item, what materials you will need to make it, gauge and sizing information, and a key of abbreviations that are used in the pattern. While it can be tempting to jump right into the good stuff, taking the time to read all the useful information and tips written by the designer can make your life much easier in the end.
Introduction
The introduction describes the garment or item that will be made. It gives an overall sketch of the item, including its key features and design elements. It will often also give you an outline of the techniques used and steps taken to make it. This section is a great overview that ensures that you will be well informed before beginning your project.
Needles & Materials Needed
This section states the very important list of tools and yarn needed to make your desired item. This list has the recommended needle sizes needed, including the lengths of cables needed if using circular needles. There is also a list of recommended yarns. Some designers might list multiple options for yarn, while others just mention the type of yarn they used to create the item. The yarn information usually lists the brand of yarn, the length per weight of the skeins and the quantity or total length needed. This section might also state other notions that you will need for your project, like buttons, elastic or zippers.
One thing to note about the recommended needles and yarns, is that these are recommended to create the correct gauge for the project. The gauge is a critical factor in ensuring that the final dimensions of the knitted item match the intended size and fit. In the next section, we will talk in more detail about making sure you have the right gauge.
Gauge & Sizing
Knitting patterns for clothing will usually come with a sizing or fit guide. This tells you about the measurements of the finished product, and which size you should choose based on your body measurements. Some garments call for negative ease, for a tight fit, while others call for positive ease, for a looser fit. The size you choose will depend on your style and fit preferences.
The sizing information of the pattern is based on the assumption that your gauge matches what is listed. The gauge depends on the thickness of the yarn you use, the size of needle you use, and how tight or loose you usually knit. There is no right or wrong gauge. However, it is important that the variation between your knitting and the designer’s knitting is not too different. If it is, you might end up with an end product that is wildly different from what you expect. The pattern instructions indicate how many stitches across and how many rows down a 4X4 inch square of knit fabric should have. To ensure that your knitting will produce a garment of the expected size, knit and wash a gauge swatch. Then you can alter your gauge accordingly to produce an item that will be the right size for you.
Abbreviations
Knitting patterns use many abbreviations for common terms in order to make the pattern less wordy and easier to read. Although some abbreviations might differ based on your region, I have found that basic abbreviations are pretty universal. A designer will usually have a key for all the abbreviations used in the pattern, which can be really useful if you are less familiar with these short-hand terms. While some commonly used terms are easy to get the hang of, it is good to make note of where the abbreviations section is, because you might find yourself referring back to it when dealing with more specialized stitches.
Instructions
After you’ve read through all the introductory sections, you will finally get to the good stuff, the pattern instructions. This is where the designer will lay out all the steps for creating the project in the order that they need to be completed. Starting with the cast on, moving on to the design, or shaping, and then the cast off and finishing touches. If the pattern does include charts, they are usually at the end of the instructions section.
Written Instructions vs. Chart Instructions
There are many cases where reading written out instructions for a knitting pattern might actually be more difficult to understand. In these cases the designer might rely on a chart to convey the knitting instructions, rather than writing out all of the stitches. As a knitter, you might find that you have a preference between written instructions and reading a chart. In some lucky situations, you might find that a designer provides the instructions in both written and chart form. That way the maker can choose what works best.
Some common uses for charts are colorwork designs, textured designs, and lacework. In some cases there will be multiple charts for different sections of the finished item. There may also be different charts for different sizes. Charts are usually well labelled and come at the end of the instructions section of a pattern. You may find yourself having to refer back and forth between written instructions and charts, so be sure that you are always looking at the correct chart for the current section of your project.
How to read a knitting pattern chart
A knitting chart will likely appear as a page full of little squares. Depending on the type of pattern these squares might be filled with symbols or colors. Charts will also come with a legend that tells you what the different symbols mean. Charts are typically read from bottom to top and from right to left. Row numbers along the right hand side of the chart can help you orient yourself. Sometimes the chart will only show every other row. This will be noted in the pattern instructions and you’ll be able to tell because the chart rows will all be odd numbers.
Flat
Reading a chart can get a bit tricky if you are reading a chart with all row numbers for a piece that is knit flat. This is because the chart shows all the stitches from the right side of the fabric. You have to read the chart from right to left when knitting the right side of the fabric and from left to right with the stitches flipped when knitting the wrong side of the fabric. Usually the chart legends are pretty clear to point this out. However, if your chart has only odd numbered rows, then typically you just purl across the wrong side, making the chart much more straightforward to read.
In the Round
Reading a knitting pattern chart in the round is fairly simple. It is always read from right to left. You still want to make sure you check to see whether the chart has the instructions for all rows or only odd numbered rows.
Tips for Pattern Reading
Read the whole pattern before you start
It can really help you get an idea of what you are getting yourself into if you read the entire pattern before you start knitting. This way you can compartmentalize the sections of your project, and you know what to expect.
Read through the whole section
Even if you have read the whole pattern at the start, it can also help to read ahead for the whole section before you start any given section. Certain sections can get tricky, and you might not realize that you made a mistake or missed something until it is too late.
Refer back at your pattern regularly
If I haven’t made it clear enough already, it is really important to refer back to your pattern regularly. Even if you are feeling confident about what to do next, you might still miss something. Waiting to check something until it is too late will just lead to frustration. It doesn’t hurt to just check and make sure you are doing the right thing.
Highlighters are your friend
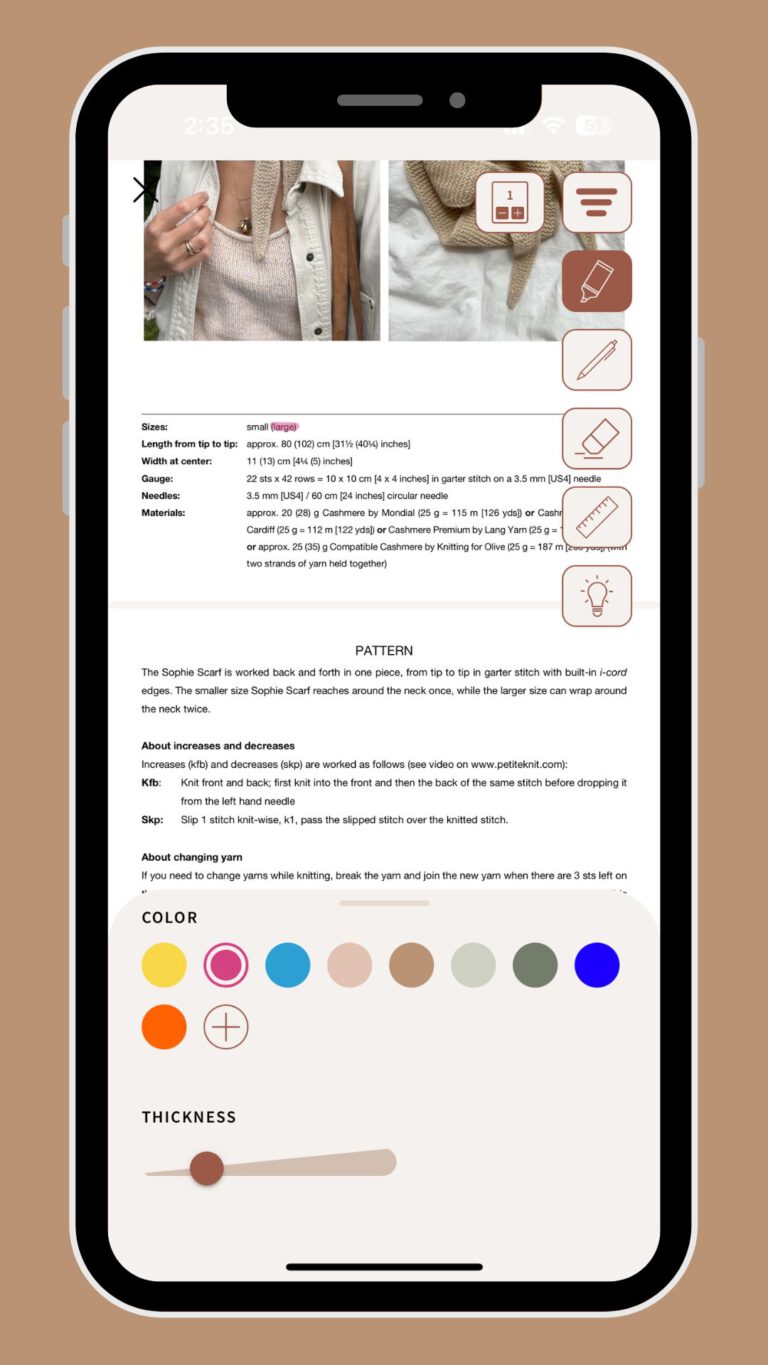
This counts for highlighting physical patterns if you print them out, or if you are using Knit&Note, making use of the highlight tool in the pattern view. Highlighting easy-to-miss details or hard-to-read sections can really help to prevent mistakes. This can also be a great tool when you are knitting clothing or other items with many various sizes.
Reading different sizes
You might be wondering how to read knitting patterns with brackets and parentheses. Items that are made to fit many different sizes will often be written out with commas, brackets, or parentheses. These numbers will typically go from the smallest size to the biggest size. Once you have read the gauge and sizing information, you will be able to determine which size is best for you. This will mean counting along the brackets to read the right numbers. It can be a challenge to always look at the right numbers for your size, especially if your chosen size is toward the middle of the sizing ranges. I recommend that you highlight or circle your size each time that the instructions include brackets. This will help to make sure that you don’t accidentally follow instructions for the wrong size.
Understanding how to read a knitting pattern is an essential next step for beginners who have mastered the basics of knitting. Deciphering a pattern can seem like a completely different challenge from knitting. However, with some practice, you can quickly become proficient in processing knitting patterns. Most patterns share common elements, despite variations in individual designers’ styles. We hope that this article has helped you in familiarizing yourself with these key components, and will enable you to navigate any pattern with confidence.

")

